Saturday, December 1, 2012

 
Simple Miniatures Photography
 
How to Make Arrows for Wargaming Miniatures
 
Malifaux Rail Golem - Part 3
 
Malifaux Rail Golem - Part 2
 
Malifaux Rail Golem - Part 1
 
How to Prime Miniatures a Dozen Different Ways
 
Malifaux Lazarus
 
15mm Battle Honors Confederate Infantry
 
Storm Giants Space Marine Terminators - Part 5
 
Storm Giants Space Marine Terminators - Part 4

Storm Giants Space Marine Terminators - Part 3

Storm Giants Space Marine Terminators - Part 2
 
Storm Giants Space Marine Terminators - Part 1

Children of the Great Pumpkin Necropolis Army
 
Lady Macbeth's Army

How to Make Winter Battlefield Bases for Wargaming Miniatures

How to Make Movement Trays - Part 2

How to Make Movement Trays - Part 1

My Wargaming Table
 
A Look At My Military History and Wargaming Book Collection

My first YouTube video, "A Look At My Miniatures Painting Studio & My Funny Dogs"

Friday, September 7, 2012

USS Mississippi (BB-23) Model


USS Mississippi (BB-23)
 
Building the Battleship for the Mississippi Department of Archives & History


All four U. S. Navy ships named for Mississippi were built for the Mississippi Department of Archives & History.  They are 39 inches in length (so four different scales) and scratchbuilt plank-on-frame.  The models are on  display in the Senate Chamber of the Old State Capitol in Jackson, Mississippi.  Read more here:


USS Mississippi (Steam Frigate), 1841-1863, modeled as she appeared when commissioned in 1841.
 
 
USS Mississippi (BB-23), 1908-1914, modeled as she appeared in 1914 at Vera Cruz.
 
USS Mississippi (BB-41), 1917-1956, modeled as she appeared in January, 1945 at Lingayen Gulf.
 
USS Mississippi (CGN-40), 1978-1997, modeled as she appeared in 1991 during Desert Storm.


Thursday, September 6, 2012

Swiss Pike Block


Swiss Pike Block 
How to make a Renaissance Swiss Pike Block for Wargaming
  
25mm Old Glory Miniatures Late Medieval & Early Renaissance Italian Wars Swiss Pikemen available from oldglory25s.com.


1.  Swish miniatures around in a bowl of diluted dishwashing soap to remove release agent and let dry overnight.   Remove flash and other extra metal with an X-Acto knife and needle files.  Smooth rough areas with sanding boards.  Drill out hands with a Dremel.
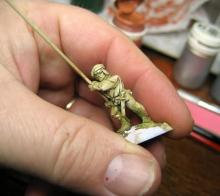


2.  For pikes, cut .049" steel wire into 90mm lengths.  This wire can be found at hobby stores that cater to radio control airplane types (control wire).  Use a Dremel with cut-off wheel attachment to sharpen points as much as you dare on the business end and to round the butt.  For flag staffs, cut .049" steel wire into 60mm lengths and round boths ends. 


3.  Glue pikemen to 20mm square bases.  Insert wires through hands and fix with super glue.


4.  Use Testors Model Master Red Putty to remove excess putty and blend and fill in base tops.  Let putty dry - it dries fast - and sand putty on base edges with sanding board or sand paper to blend with base sides.  Testors Model Master Red Putty does not stink, does not shrink, and is slightly coarse.


5.  Prime figures.  Citadel White Primer was used in this case, but any quality figure primer will do.


6.  Wash figures with ink.  I used Reaper Pro Paint Wood Shade Ink here.  Drying time is about 30 minutes.


7.  Paint flesh on faces and hands.  I kept it simple, as you can see in the close-up at the top of the page.  I used Reaper Master Series Paint (MSP) Rosy Shadow washed with MSP Brown Ink and then MSP Rosy Skin to highlight.  I will not mention paint choices again as any combinations will work just fine.


 8.   Paint the hose and shoes.


9.  Paint shirts, hats, belts and metal bits (armor, helmets, buckles and sword hilts).


10.  Paint flag staffs (the parts that will be exposed).  Paint flags on copy paper.  I chose the flags of Uri and Zurich.  Fold the flags in half to match sides up, and trim any overlap/excess edges.  Apply white glue to inside of flags and fold the flags around poles.  Use a paint brush handle to shape before white glue dries.  Paint the edges of the flags (don't leave white edges).


11.  Paint pikes.


11.  Paint base edges and let dry.  Paint the tops of the bases one at a time and immediately apply Noch Spring Green Static Grass while paint is still wet.


12.  Seal with two coats of Floquil Figure Flat.


All done and ready for a fight!